You just got a new Windows 11 PC — or maybe your current one has slowed to a crawl — and you’re wondering why it feels sluggish right out of the box. The answer is almost always the same: bloatware. Pre-installed apps, background processes, and software you never asked for are quietly eating up your memory, storage, and processing power before you even open a browser.
At PCITService.com, cleaning up bloatware is one of the most common tune-ups we perform for clients. The good news is that many of these fixes are things you can do yourself, right now, without any special tools.
What Is Bloatware?
Bloatware refers to software that comes pre-installed on your PC that you did not choose and likely do not need. It can come from three sources:
Microsoft — Windows 11 ships with a number of built-in apps like Candy Crush, Microsoft Solitaire Collection, Tips, Weather, and others that many users never open.
Your PC Manufacturer — brands like HP, Dell, Lenovo, and Asus often bundle their own trial software, utilities, and promotional apps onto new machines before they leave the factory.
Software You Installed — over time, many applications install additional toolbars, companion programs, or automatic updaters that run in the background without your knowledge.
All of it adds up, and the result is a PC that feels slower than it should.
Tip 1 — Uninstall Apps You Don’t Use
Start with the obvious: remove software you don’t need.
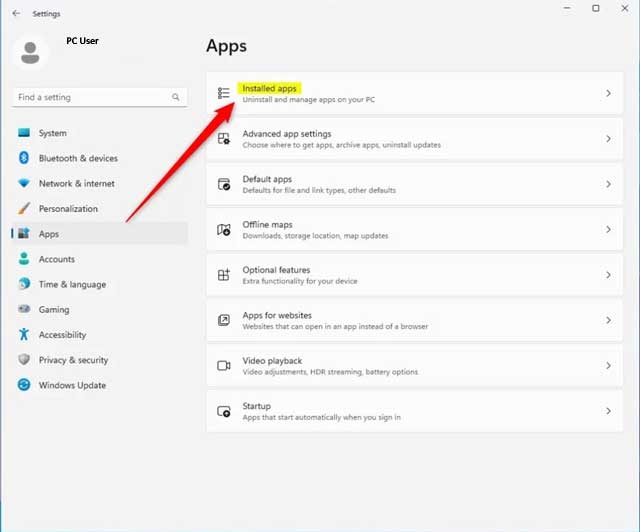
Go to Settings, then Apps, then Installed Apps. Sort the list by size to find the biggest offenders. Go through everything and uninstall anything you don’t recognize or haven’t used. Right-click the Start menu and select Installed Apps as a quick shortcut to get there.
Pay particular attention to trial versions of antivirus software (your new PC may have a 30 or 60-day Norton or McAfee trial pre-loaded), manufacturer utility suites, shopping apps, and games you didn’t choose.
Tip 2 — Remove Microsoft’s Built-In Apps
Some of Windows 11’s pre-installed Microsoft apps can be uninstalled just like regular software — simply find them in the Installed Apps list and remove them. Others are a little more stubborn and require a different approach.
For apps that won’t uninstall through Settings, you can use Windows PowerShell. Right-click the Start button, select Terminal (Admin), and use the Get-AppxPackage command to identify and remove specific apps. This is a more advanced step, so if you’re not comfortable in PowerShell, skip to the other tips or give us a call at PCITService.com and we can handle it for you.
Tip 3 — Disable Startup Programs
One of the fastest wins for a slow PC is cutting down the number of programs that launch automatically when Windows starts. Every app that opens at startup is competing for your CPU and RAM before you’ve even done anything.
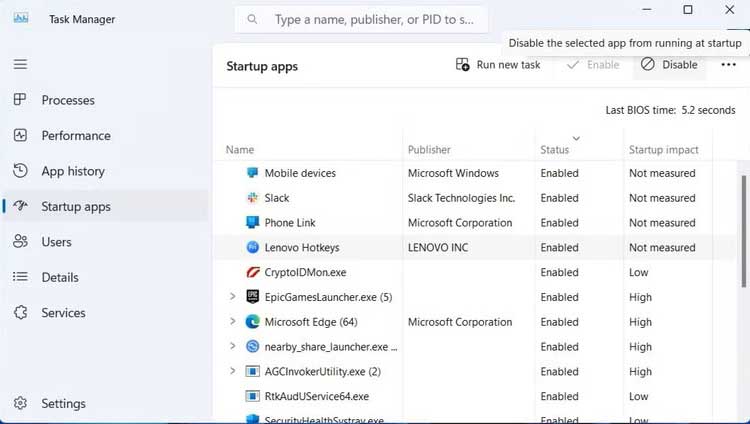
Press Ctrl + Shift + Esc to open Task Manager, then click the Startup Apps tab. You’ll see a list of everything that runs at boot and its impact rating — High, Medium, or Low. Right-click anything rated High that you don’t need running immediately and select Disable. Common culprits include Spotify, Teams, Discord, OneDrive, manufacturer update tools, and browser helpers.
Disabling a startup app does not uninstall it — it just stops it from loading automatically. You can still open it manually whenever you need it.
Tip 4 — Turn Off Background App Permissions
Windows 11 allows apps to run in the background and receive data even when you’re not actively using them. For many apps, this is unnecessary and just drains your resources.
Go to Settings, then Apps, then Installed Apps. Click the three-dot menu next to an app, select Advanced Options, and under Background App Permissions, set it to Never. Do this for any app that doesn’t need to update or send you notifications in real time.
Tip 5 — Review Your Browser Extensions
Bloat doesn’t only live in your apps list. Browser extensions — especially ones that got installed quietly alongside other software — can significantly slow down your browsing and consume memory.
Open your browser’s extension or add-on manager and remove anything you don’t recognize or actively use. Ad injectors, coupon finders, toolbars, and “download helpers” are frequent offenders.
Tip 6 — Disable Widgets and Notifications You Don’t Need
Windows 11 includes a Widgets panel in the taskbar that continuously pulls in news, weather, and other live content. If you don’t use it, turn it off.
Go to Settings, then Personalization, then Taskbar, and toggle Widgets off. You can also go to Settings, then System, then Notifications to review and disable notifications from apps you don’t care about. These small changes reduce background activity and cut down on distractions.
Tip 7 — Run Disk Cleanup and Free Up Storage
Once you’ve removed unwanted apps, run the built-in Disk Cleanup tool to clear out temporary files, old Windows update files, and other junk that accumulates over time.
Search for Disk Cleanup in the Start menu, select your drive, then click Clean up system files for the most thorough clean. You can also go to Settings, then System, then Storage, and turn on Storage Sense to have Windows automatically clean up unnecessary files on a schedule.
When to Call a Professional
If you have followed these steps and your PC is still running slow, the problem may go deeper than bloatware. Outdated drivers, failing hardware, a fragmented hard drive, or even a malware infection can all cause persistent sluggishness that software clean-up alone won’t fix.
That’s where PCITService.com comes in. Our technicians can diagnose exactly what’s dragging your system down and get it running the way it should — without the guesswork.